Thursday, March 23, 2017
Free Hide Folder v2 5 Serial Tutorial
Free Hide Folder v2 5 Serial Tutorial
 Sesuai dengan namanya, Software ini mungkin sudah banyak yang tahu kegunaannya. yang belum tahu silahkan di simak dulu ok... Free Hide Folder v2.5 merupakan sebuah software security yang berfungsi untuk mengunci folder / memproteksi folder / menyembunyikan folder agar orang lain tidak bisa mengaksesnya. Selain itu juga terdapat Hide dan Unhide folder dan aplikasi Free Hide Folder menyediakan fitur backup yang dapat digunakan untuk membackup suatu folder yang telah anda pilih. Wow mantap , silahkan di cek cek cek >>>
Screenshot : Free Hide Folder v2.5
Cara menggunakan Free Hide Folder :
Pertama-tama saya ingin menyembunyikan Folder PluzsoftwarE yang ada di partisi C: seperti gambar dibawah : 
lalu selanjutnya ikuti langkah dibawah ini :
1. Install Dulu Free Hide Folder sperti biasa lalu setelah install secara otomatis akan muncul kotak dibawah ini Kemudian masukkan password dan jangan sampai lupa karena password inilah yang digunakan setiap kali menjalankan Free Hide Folder. 
2. Kemudian klik OK dan kemudian akan tampil jendela di mana Anda diminta untuk melakukan registrasi (lihat gambar di bawah). 
3. Setelah itu Untuk memulai, pilih menu File kemudian pilih Add to list kemudian pilih folder yang ingin kita proteksi, seperti di bawah ini. 
4. Kemudian tinggal klik OK maka akan muncul peringatan yang isinya kita disuruh membuat back up agar jika terjadi sesuatu kita dapat merestorenya kembali. (lihat gambar di bawah ini). 
5. Maka setelah kita klik OK maka secara otomatis folder tersebut sudah tidak terlihat lagi. Untuk membuktikan, buka windows explorer, kemudian cari folder tersebut niscaya Anda sudah tidak menemukannya lagi. (lihat gambar dibawah ini) 
6. Maka secara otomatis Folder PluzsoftwarE yang Tersimpan C: sudah tersembunyi .(lihat screenshot dibawah) 
Beberapa fitur utama aplikasi Free Hide Folder diantaranya:
-Menyembunyikan folder yang anda inginkan.
-Perlindungan password saat menjalankan aplikasi.
-Tidak ada struktur file yang perlu untuk dimodifikasi.
-Mudah digunakan.
-100% gratis dan tentunya bebas spyware, adware atau virus.
Note!!
Aplikasi Free Hide Folder ini dapat dijalankan pada sistem operasi windows 9x, ME, NT, XP, 2003, Vista hingga windows 7
Bagi yang mau mencobanya silahkan download dibawah ini :
via ziddu - 1.03 Mb
Selamat Mencoba !!!
Available link for download
Sunday, March 19, 2017
GNS 3 Tutorial – Basic Router password Configuration
GNS 3 Tutorial – Basic Router password Configuration
Hi folks..I have started my first steps into Cisco, & would be sharing my small experiments in it. 
So, firstly download GNS3 & install it. Get IOS images from and load them (if you are really not sure of this step, mail me, I will expand the basics more)
The topology I created is this -

2 routers connected via gigabit . What we will be doing is -
- Set router password.
- Set telnet password
- Set Console Password
- Encrypt All passwords.
- Set Ip Address of routers.
Anyways, I start by right clicking on R2 router.
Connected to Dynamips VM "R2" (ID 7, type c7200) - Console port
To get into privilege mode, type this command.
R2>en
To configure router, type this command ..
R2#conf t
Enter configuration commands, one per line. End with CNTL/Z.
To set router password & encrypt all passwords type these commands
R2(config)#enable secret router2
R2(config)#service pass
R2(config)#service password-encryption
Now to set console & its password type these commands
R2(config)#line console 0
R2(config-line)#password console
R2(config-line)#login
R2(config-line)#exit
Now to set telnet (vty/virtual terminal) & its password type these commands
R2(config)#line vty 0 4
R2(config-line)#password telnet
R2(config-line)#login
R2(config-line)#exit
Once done, you can now configure the interface by typing these commands
R2(config)#int g1/0
R2(config-if)#desc ROUTER LAN 2 GIGABIT INTERFACE
R2(config-if)#ip address 192.168.1.20 255.255.255.0
R2(config-if)#no shut
R2(config-if)#
*Feb 19 19:56:42.035: %LINK-3-UPDOWN: Interface GigabitEthernet1/0, changed state to up
R2(config-if)#
*Feb 19 19:56:42.035: %ENTITY_ALARM-6-INFO: CLEAR INFO Gi1/0 Physical Port Administrative State Down
*Feb 19 19:56:43.035: %LINEPROTO-5-UPDOWN: Line protocol on Interface GigabitEthernet1/0, changed state to up
R2(config-if)#end
*Feb 19 19:56:47.723: %SYS-5-CONFIG_I: Configured from console by console
R2#
Once done, you can see the configuration by typing -
R2#show running-config
Building configuration...Current configuration : 932 bytes
!
upgrade fpd auto
version 12.4
service timestamps debug datetime msec
service timestamps log datetime msec
service password-encryption
!
hostname R2
!
boot-start-marker
boot-end-marker
!
enable secret 5 $1$trNZ$uNTgBIA1QG43/4YEB29lf/
!
no aaa new-model
ip cef
!
!
!
!
no ip domain lookup
!
multilink bundle-name authenticated
!
!
!
archive
log config
hidekeys
!
!
interface FastEthernet0/0
no ip address
shutdown
duplex half
!
interface GigabitEthernet1/0
description ROUTER LAN 2 GIGABIT INTERFACE
ip address 192.168.1.20 255.255.255.0
negotiation auto
!
no ip http server
no ip http secure-server
!
!
!
logging alarm informational
!
!
control-plane
!
!
gatekeeper
shutdown
!
!
line con 0
exec-timeout 0 0
password 7 070C2E425D061500
logging synchronous
login
stopbits 1
line aux 0
stopbits 1
line vty 0 4
password 7 06120A2D424B1D
login
!!
webvpn cef
!
endR2#
If done properly, it will look like more or less the same I have pasted above. Also, as you can see, all the passwords are encrypted. In the similar way you can configure Router 1. Make a note os passwords, I have kept quite simple passwords just to demonstrate the configuration. Please keep secure passwords , read my article on how to create secure passwords.
I hope you enjoyed this simple guide, till next time.
Available link for download
Thursday, March 9, 2017
Ghosting An Image With Photoshop CS6 Photoshop tutorial
Ghosting An Image With Photoshop CS6 Photoshop tutorial

In this photo effects tutorial, well learn how to "ghost" an image. In other words, well see how to give someone in a photo a more ghostly, supernatural look, a great effect whether youre a fan of horror movies or just looking for a fun and easy way to spruce up a photo for Halloween. This new version of our original Ghosting An Image tutorial is now fully updated for Photoshop CS6 and compatible with Photoshop CC (Creative Cloud). Check out the original version if youre using Photoshop CS5 or earlier.
New in this version of the tutorial, well be using Smart Objects and Smart Filters to create much of the effect, and well also be taking advantage of Photoshops ability to nest Smart Objects inside of other Smart Objects! As well see, the benefit is that each of the Smart Filters well be applying to the image will have its own unique layer mask! If that sounds more advanced than your current Photoshop skill level, dont worry. As with all of our Photoshop tutorials, Ill be explaining every step along the way.
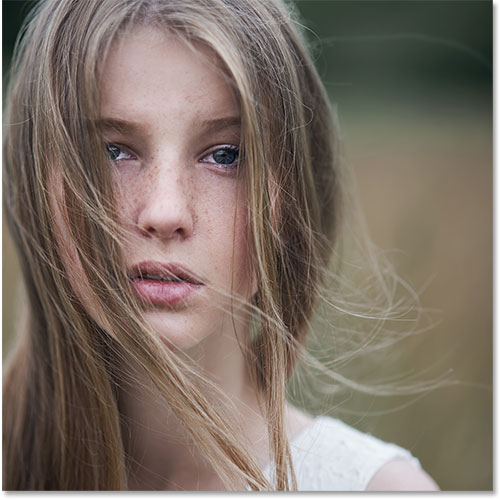
Of course, when creating any type of photo effect, it helps to start with the right type of image. Heres the one Ill be using (girl in field photo from Shutterstock):
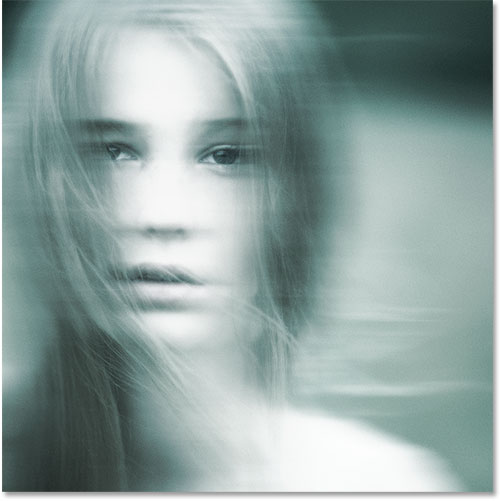
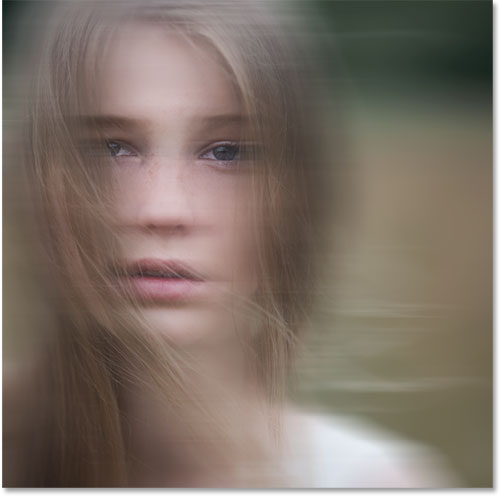
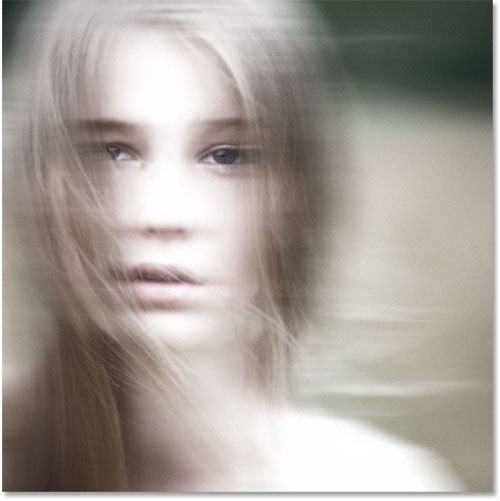
And heres what the final "ghosting" effect will look like:
Lets get started!
Step 1: Convert The Background Layer Into A Smart Object
With my photo newly opened in Photoshop, if we look in my Layers panel, we see the image sitting on the Background layer which is currently the only layer in the document:
Lets convert this Background layer into a Smart Object. Click on the small menu icon in the top right corner of the Layers panel:
Choose Convert to Smart Object from the menu that appears:
It wont look like anything has happened to the image, but we can now see a small Smart Object icon in the bottom right corner of the layers preview thumbnail in the Layers panel. This is Photoshops way of telling us the layer is now a Smart Object:
Step 2: Apply The Motion Blur Filter
Well use a couple of Photoshops filters to create the main ghosting effect, and well start with the Motion Blur filter. Go up to the Filter menu in the Menu Bar along the top of Photoshops interface, choose Blur, then choose Motion Blur:
This opens the Motion Blur filters dialog box. Start by setting the Angle for the blur to 0°. Then, increase the amount of blurring by dragging the Distance slider along the bottom of the dialog box. The further you drag it to the right, the more motion blur will be applied. The exact amount you use will depend a lot on the size of your image. In the original version of this tutorial, I was using a fairly small photo so I set my Distance value to around 95 pixels. This time, Im using a much larger image so to achieve the same amount of blurring, I need to set the value much higher (to around 500 pixels). The easiest thing to do is to keep an eye on your image in the document window to judge the results as you drag the slider:
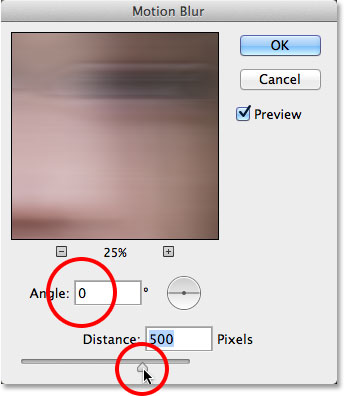
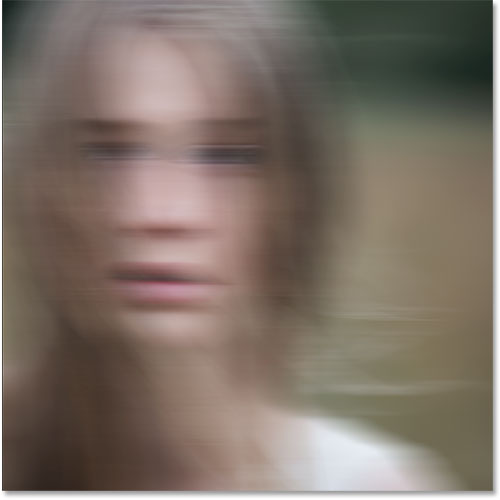
Click OK when youre done to close out of the Motion Blur dialog box. Your blur effect should look similar to this:
If we look again in the Layers panel, we see that because we first converted the Background layer into a Smart Object, the Motion Blur filter was added as a Smart Filter. If you dont think you added enough of a blurring effect, or maybe you added too much, just double-click on the Motion Blur filters name below the Smart Object to re-open its dialog box and re-adjust the Distance slider. Your changes will be instantly updated in the image (click OK to close out of the dialog box again when youre done):
Step 3: Select The Smart Filter Mask
Click on the Smart Filters mask thumbnail in the Layers panel to select the mask. A white highlight border will appear around it letting you know its selected:
Step 4: Select The Brush Tool
Were going to use the mask to bring back some of the original non-blurred areas of the image. Select Photoshops Brush Tool from the Tools panel along the left of the screen (or press the letter B on your keyboard to select the Brush Tool with the shortcut):
Step 5: Set The Brush Color To Black
Well need to paint on the mask with black to reveal some of the original photo, which means we first need to set our brush color to black. Photoshop uses the current Foreground color as the brush color, so with the mask selected in the Layers panel, press the letter D on your keyboard. This will reset the Foreground and Background colors to their defaults, with white as the Foreground color and black as the Background color. Then, press the letter X on your keyboard to swap them, which sets the Foreground color to black.
You can see the current Foreground and Background colors in the color swatches near the bottom of the Tools panel. The Foreground color (upper left swatch) should now be black:
Step 6: Lower The Brush Opacity To 25%
With the Brush Tool selected, go up to the Options Bar along the top of the screen and lower the Opacity value to 25%. This will allow us to reveal the original image gradually with each brush stroke, making it easier to fine-tune the amount of blurring in a certain area (rather than the "all or nothing" approach wed get by painting with a brush opacity of 100%):

Step 7: Select A Round, Soft-Edge Brush
Right-click (Win) / Control-click (Mac) anywhere inside the image to open the Brush Preset picker and choose a round, soft-edge brush from the list. Ill choose the very first one in the top left corner by clicking on its icon. This gives us a brush with a Hardness value of 0%, or in other words, the softest edge possible. Press Enter (Win) / Return (Mac) when youre done to close out of the dialog box:
Step 8: Paint Over Areas To Reveal The Original Photo
With the Brush Tool in hand, black as your Foreground color and the brush opacity lowered to 25%, begin painting over areas where you want to reveal the original image through the motion blur effect, like the persons eyes, nose and mouth. Each time you paint a brush stroke over the same area, youll reveal a bit more of the original image (make sure to release your mouse button in between brush strokes). You can adjust the size of your brush directly from your keyboard. Press the right bracket key ( ] ) repeatedly to make the brush larger or the left bracket key ( [ ) to make it smaller. If you accidentally paint over the wrong area, or youve revealed too much of the original image in a certain area, press the letter X on your keyboard to swap the Foreground and Background colors, which will set your Foreground color to white. Paint over the area with white to bring back the motion blur effect, then press X again to set your Foreground color back to black and continue painting.
Here, Ive painted over the center area of the girls face to reveal her eyes, nose and mouth through the motion blur effect, and Ive also painted along some of her hair:
If we look at the mask thumbnail in the Layers panel, we can see where we painted with black. The rest of the area (filled with white) is where the motion blur effect remains at full strength:
Step 9: Nest The Smart Object Inside Another Smart Object
Weve applied the Motion Blur filter, so were ready to add our second filter. This second filter will need to be applied to the entire image, and that creates a potential problem. Well need a separate mask for each of our filters, yet Photoshop only gives us one mask thats shared between all Smart Filters applied to the same Smart Object. Weve already used that mask to hide some of the motion bur effect, so how can we get a separate mask for our second filter?
The answer is simple. We just need to nest our existing Smart Object inside another one! To do that, with the original Smart Object selected in the Layers panel, click once again on the menu icon in the top right corner of the Layers panel:
Choose Convert to Smart Object from the list, just as we did before:
It looks like weve lost our original Smart Object in the Layers panel, or at least lost the Motion Blur Smart Filter that was listed below it, but whats actually happened is that Photoshop has nested our initial Smart Object, along with its Motion Blur filter effect, inside a brand new Smart Object:
Step 10: Apply The Diffuse Glow Filter
Lets apply our second filter, Diffuse Glow, which adds a glow effect to the image using our current Background color as the color for the glow. Before we select the filter, press the letter D on your keyboard just to quickly reset your Foreground and Background colors. This will make sure our Background color is set to white. Then, go up to the Filter menu at the top of the screen and choose Filter Gallery:
This opens Photoshops large Filter Gallery dialog box, with a preview area on the left, the filters and filter categories in the middle column, and options for the currently selected filter on the right. Click on the Distort category in the middle column to twirl it open, then click on the Diffuse Glow filter to select it:
Related Tutorial: Restore Missing Filters in Photoshop CS6
The options for the Diffuse Glow filter appear along the right of the Filter Gallery, and theres three options we can set. The first is Graininess, which adds a grain effect (you probably figured that one out). Im going to set my Graininess value to 6 but as with each of these options, feel free to experiment on your own and see what you think works best.
The second option, Glow Amount, controls the intensity of the glow. Ill set mine to 10. Finally, Clear Amount behaves like the opposite to Glow Amount. Lower settings increase the range of the glow, causing more of the image to be affected, while higher settings limit its range. Ill set mine to 10 as well, but as I mentioned, feel free to try different settings with your image:
Click OK when youre done to accept your settings and close out of the Filter Gallery. Heres my image with Diffuse Glow applied:
If we look in the Layers panel, we see the Filter Gallery listed as a Smart Filter under the Smart Object. We also see that because we nested our initial Smart Object inside this second one, we now have a brand new mask to use with our Diffuse Glow filter, even though theres nothing we need to do with it since we want the Diffuse Glow effect to apply to the entire image:
If you want to go back and edit any of your settings for the Diffuse Glow filter, simply double-click on the Filter Gallery Smart Filter. Or, if you find your glow effect is too strong, you can reduce its opacity value by double-clicking on the Blending Options icon:
This will open the Blending Options dialog box where you can either lower the filters opacity or change its blend mode. Youll want to leave the blend mode set to Normal, but Ill lower my opacity down to 90% just to reduce the glow effect a little bit:
Click OK when you’re done to close out of the dialog box. Here’s my image after lowering the opacity:

Step 11: Add A Hue/Saturation Adjustment Layer
Lets finish off the ghosting effect by colorizing it with a Hue/Saturation adjustment layer. Click on the Hue/Saturation icon in the Adjustments panel (first icon on the left, middle row):
Photoshop adds a new Hue/Saturation adjustment layer directly above the Smart Object in the Layers panel:
The controls and options for the Hue/Saturation adjustment layer appear in Photoshops Properties panel. First, select the Colorize option near the bottom of the panel by clicking inside its checkbox. This will allow us to colorize the entire image with a single color. Then, drag the Hue slider left or right to select a color. Youll see the color changing in the document as you drag the slider. I think a greenish blue works well for the ghosting effect so Ill set my Hue value to around 180:
Heres my image after colorizing it:

Step 12: Change The Blend Mode To Color And Lower The Opacity
Finally, change the blend mode of the Hue/Saturation layer from Normal to Color. The difference may be slight, but this will allow the adjustment layer to affect only the colors in the image without affecting the brightness values. Youll find the blend mode option in the top left of the Layers panel. Directly across from the blend mode option is the Opacity option. Lowering it from its default value of 100% will allow some of the original colors from the image to show through. You may or may not like the result with your image so this final step is optional, but in my case, Ill lower the opacity to around 60%:
And with that, were done! Here, for comparison, is the original image once again:
And here, after changing the blend mode and lowering the opacity of the Hue/Saturation adjustment layer, is my final "ghost" effect:
 Tags :- Photoshop 8 , Photoshop 7 trick , trick for Photoshop CS6 , photoshop PNG , Png Images , image png , png , transparent images , transparent png , psd , psd image , png free , download png , png for free , png blogspot , png photoshop , photoshop png images , images for photoshop , cs5 trick , photoshop tricks , photoshop tricks , photoshop background , photoshop psd , photoshop cs5, photoshop cs5 trick,