Friday, March 24, 2017
Free Download BabylonPro 8 0 Full With Serial Key Crack File
Free Download BabylonPro 8 0 Full With Serial Key Crack File
Please Click Here For Download Babylon
Available link for download
Wednesday, March 15, 2017
Glary Utilities 5 47 0 67 PRO With Serial Key
Glary Utilities 5 47 0 67 PRO With Serial Key

Glary Utilities 5 47 0 67 PRO With Serial Key
Glary Utilities 5 47 0 67 PRO With Serial Key Glary Utilities is a shrewd and solid application that offers various effective and simple to-use framework apparatuses and utilities to alter, speed up, keep up and secure your PC.
It permits you to clean regular framework garbage documents, and in addition invalid registry sections and Internet follows. You can oversee and erase program additional items, break down circle space use and discover copy records.
Whats New..?
Upgraded Disk Cleaner: included VSO Blu-beam Converter Ultimate and VSO DVD Converter Ultimate
Upgraded Tracks Eraser: included Foxit Reader and Stardock WindowBlinds
Minor GUI changes
Minor bug fixes
Step by step instructions to Install
Download and unfasten.
At that point open separated envelope and run Setup
After instalation complete enter key from roar
Thats it in a nutshell. Appreciate
Direct Download Link:
Download
Download Glary Utilities 5.47 + Keys 14.57 MB
Available link for download
Thursday, March 9, 2017
Ghosting An Image With Photoshop CS6 Photoshop tutorial
Ghosting An Image With Photoshop CS6 Photoshop tutorial

In this photo effects tutorial, well learn how to "ghost" an image. In other words, well see how to give someone in a photo a more ghostly, supernatural look, a great effect whether youre a fan of horror movies or just looking for a fun and easy way to spruce up a photo for Halloween. This new version of our original Ghosting An Image tutorial is now fully updated for Photoshop CS6 and compatible with Photoshop CC (Creative Cloud). Check out the original version if youre using Photoshop CS5 or earlier.
New in this version of the tutorial, well be using Smart Objects and Smart Filters to create much of the effect, and well also be taking advantage of Photoshops ability to nest Smart Objects inside of other Smart Objects! As well see, the benefit is that each of the Smart Filters well be applying to the image will have its own unique layer mask! If that sounds more advanced than your current Photoshop skill level, dont worry. As with all of our Photoshop tutorials, Ill be explaining every step along the way.
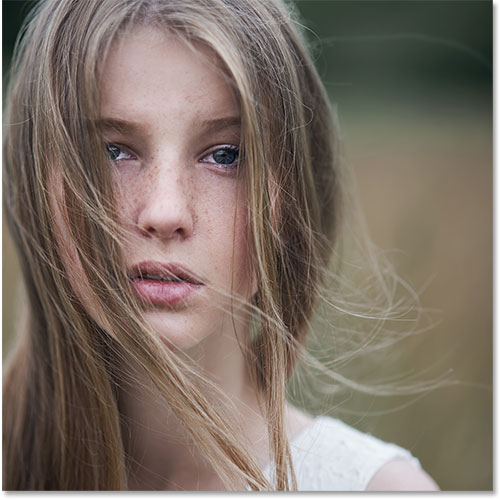
Of course, when creating any type of photo effect, it helps to start with the right type of image. Heres the one Ill be using (girl in field photo from Shutterstock):
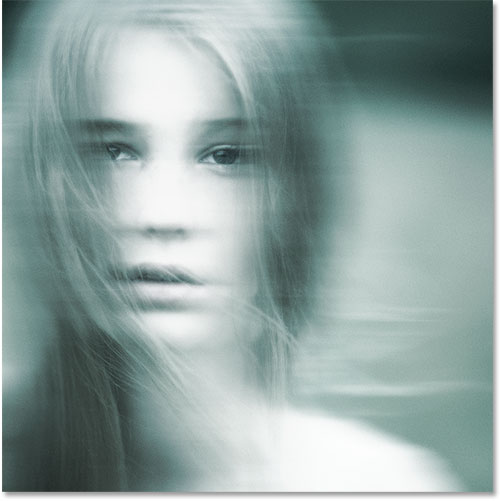
And heres what the final "ghosting" effect will look like:
Lets get started!
Step 1: Convert The Background Layer Into A Smart Object
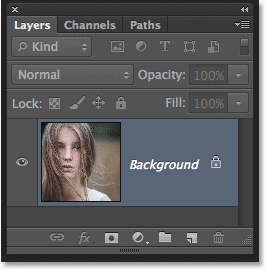
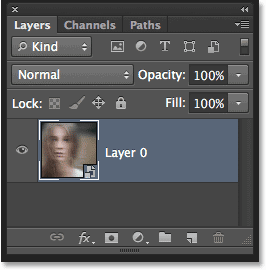
With my photo newly opened in Photoshop, if we look in my Layers panel, we see the image sitting on the Background layer which is currently the only layer in the document:
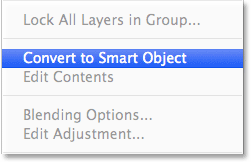
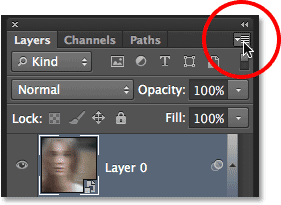
Lets convert this Background layer into a Smart Object. Click on the small menu icon in the top right corner of the Layers panel:
Choose Convert to Smart Object from the menu that appears:
It wont look like anything has happened to the image, but we can now see a small Smart Object icon in the bottom right corner of the layers preview thumbnail in the Layers panel. This is Photoshops way of telling us the layer is now a Smart Object:
Step 2: Apply The Motion Blur Filter
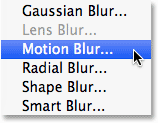
Well use a couple of Photoshops filters to create the main ghosting effect, and well start with the Motion Blur filter. Go up to the Filter menu in the Menu Bar along the top of Photoshops interface, choose Blur, then choose Motion Blur:
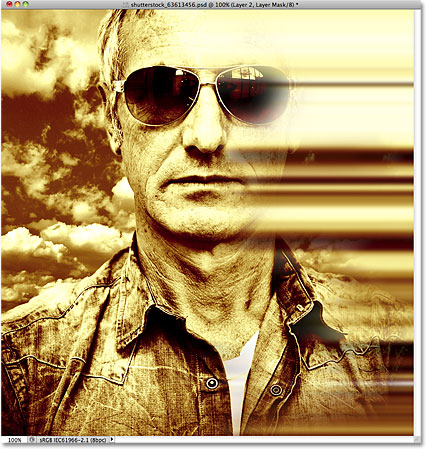
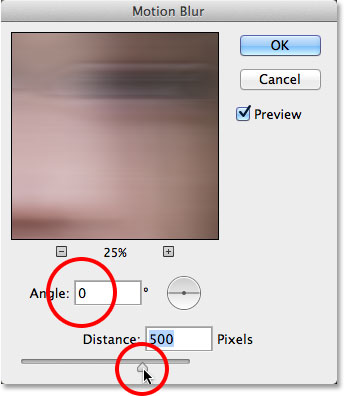
This opens the Motion Blur filters dialog box. Start by setting the Angle for the blur to 0°. Then, increase the amount of blurring by dragging the Distance slider along the bottom of the dialog box. The further you drag it to the right, the more motion blur will be applied. The exact amount you use will depend a lot on the size of your image. In the original version of this tutorial, I was using a fairly small photo so I set my Distance value to around 95 pixels. This time, Im using a much larger image so to achieve the same amount of blurring, I need to set the value much higher (to around 500 pixels). The easiest thing to do is to keep an eye on your image in the document window to judge the results as you drag the slider:
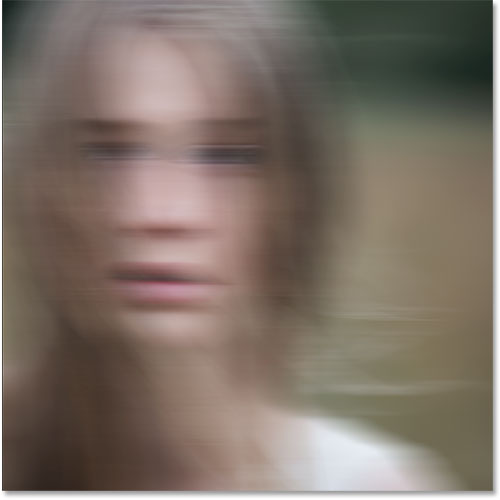
Click OK when youre done to close out of the Motion Blur dialog box. Your blur effect should look similar to this:
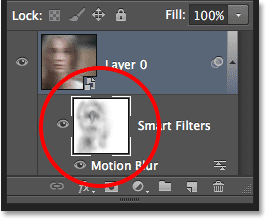
If we look again in the Layers panel, we see that because we first converted the Background layer into a Smart Object, the Motion Blur filter was added as a Smart Filter. If you dont think you added enough of a blurring effect, or maybe you added too much, just double-click on the Motion Blur filters name below the Smart Object to re-open its dialog box and re-adjust the Distance slider. Your changes will be instantly updated in the image (click OK to close out of the dialog box again when youre done):
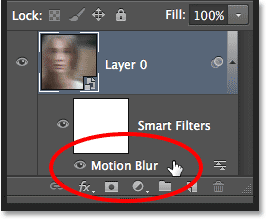
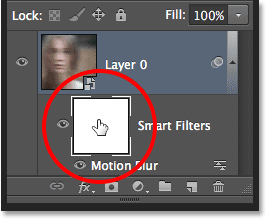
Step 3: Select The Smart Filter Mask
Click on the Smart Filters mask thumbnail in the Layers panel to select the mask. A white highlight border will appear around it letting you know its selected:
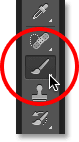
Step 4: Select The Brush Tool
Were going to use the mask to bring back some of the original non-blurred areas of the image. Select Photoshops Brush Tool from the Tools panel along the left of the screen (or press the letter B on your keyboard to select the Brush Tool with the shortcut):
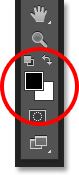
Step 5: Set The Brush Color To Black
Well need to paint on the mask with black to reveal some of the original photo, which means we first need to set our brush color to black. Photoshop uses the current Foreground color as the brush color, so with the mask selected in the Layers panel, press the letter D on your keyboard. This will reset the Foreground and Background colors to their defaults, with white as the Foreground color and black as the Background color. Then, press the letter X on your keyboard to swap them, which sets the Foreground color to black.
You can see the current Foreground and Background colors in the color swatches near the bottom of the Tools panel. The Foreground color (upper left swatch) should now be black:
Step 6: Lower The Brush Opacity To 25%
With the Brush Tool selected, go up to the Options Bar along the top of the screen and lower the Opacity value to 25%. This will allow us to reveal the original image gradually with each brush stroke, making it easier to fine-tune the amount of blurring in a certain area (rather than the "all or nothing" approach wed get by painting with a brush opacity of 100%):

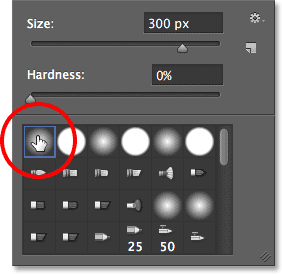
Step 7: Select A Round, Soft-Edge Brush
Right-click (Win) / Control-click (Mac) anywhere inside the image to open the Brush Preset picker and choose a round, soft-edge brush from the list. Ill choose the very first one in the top left corner by clicking on its icon. This gives us a brush with a Hardness value of 0%, or in other words, the softest edge possible. Press Enter (Win) / Return (Mac) when youre done to close out of the dialog box:
Step 8: Paint Over Areas To Reveal The Original Photo
With the Brush Tool in hand, black as your Foreground color and the brush opacity lowered to 25%, begin painting over areas where you want to reveal the original image through the motion blur effect, like the persons eyes, nose and mouth. Each time you paint a brush stroke over the same area, youll reveal a bit more of the original image (make sure to release your mouse button in between brush strokes). You can adjust the size of your brush directly from your keyboard. Press the right bracket key ( ] ) repeatedly to make the brush larger or the left bracket key ( [ ) to make it smaller. If you accidentally paint over the wrong area, or youve revealed too much of the original image in a certain area, press the letter X on your keyboard to swap the Foreground and Background colors, which will set your Foreground color to white. Paint over the area with white to bring back the motion blur effect, then press X again to set your Foreground color back to black and continue painting.
Here, Ive painted over the center area of the girls face to reveal her eyes, nose and mouth through the motion blur effect, and Ive also painted along some of her hair:
If we look at the mask thumbnail in the Layers panel, we can see where we painted with black. The rest of the area (filled with white) is where the motion blur effect remains at full strength:
Step 9: Nest The Smart Object Inside Another Smart Object
Weve applied the Motion Blur filter, so were ready to add our second filter. This second filter will need to be applied to the entire image, and that creates a potential problem. Well need a separate mask for each of our filters, yet Photoshop only gives us one mask thats shared between all Smart Filters applied to the same Smart Object. Weve already used that mask to hide some of the motion bur effect, so how can we get a separate mask for our second filter?
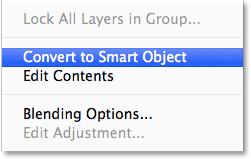
The answer is simple. We just need to nest our existing Smart Object inside another one! To do that, with the original Smart Object selected in the Layers panel, click once again on the menu icon in the top right corner of the Layers panel:
Choose Convert to Smart Object from the list, just as we did before:
It looks like weve lost our original Smart Object in the Layers panel, or at least lost the Motion Blur Smart Filter that was listed below it, but whats actually happened is that Photoshop has nested our initial Smart Object, along with its Motion Blur filter effect, inside a brand new Smart Object:
Step 10: Apply The Diffuse Glow Filter
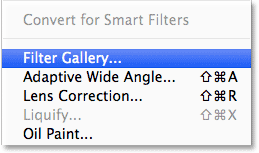
Lets apply our second filter, Diffuse Glow, which adds a glow effect to the image using our current Background color as the color for the glow. Before we select the filter, press the letter D on your keyboard just to quickly reset your Foreground and Background colors. This will make sure our Background color is set to white. Then, go up to the Filter menu at the top of the screen and choose Filter Gallery:
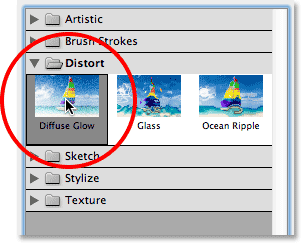
This opens Photoshops large Filter Gallery dialog box, with a preview area on the left, the filters and filter categories in the middle column, and options for the currently selected filter on the right. Click on the Distort category in the middle column to twirl it open, then click on the Diffuse Glow filter to select it:
Related Tutorial: Restore Missing Filters in Photoshop CS6
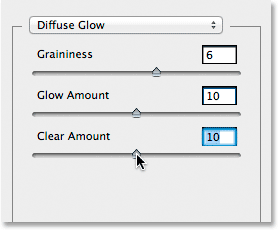
The options for the Diffuse Glow filter appear along the right of the Filter Gallery, and theres three options we can set. The first is Graininess, which adds a grain effect (you probably figured that one out). Im going to set my Graininess value to 6 but as with each of these options, feel free to experiment on your own and see what you think works best.
The second option, Glow Amount, controls the intensity of the glow. Ill set mine to 10. Finally, Clear Amount behaves like the opposite to Glow Amount. Lower settings increase the range of the glow, causing more of the image to be affected, while higher settings limit its range. Ill set mine to 10 as well, but as I mentioned, feel free to try different settings with your image:
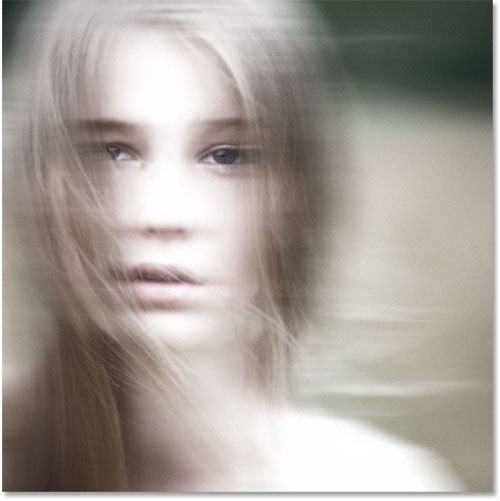
Click OK when youre done to accept your settings and close out of the Filter Gallery. Heres my image with Diffuse Glow applied:
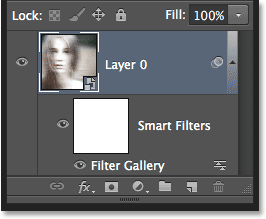
If we look in the Layers panel, we see the Filter Gallery listed as a Smart Filter under the Smart Object. We also see that because we nested our initial Smart Object inside this second one, we now have a brand new mask to use with our Diffuse Glow filter, even though theres nothing we need to do with it since we want the Diffuse Glow effect to apply to the entire image:
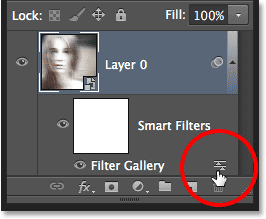
If you want to go back and edit any of your settings for the Diffuse Glow filter, simply double-click on the Filter Gallery Smart Filter. Or, if you find your glow effect is too strong, you can reduce its opacity value by double-clicking on the Blending Options icon:
This will open the Blending Options dialog box where you can either lower the filters opacity or change its blend mode. Youll want to leave the blend mode set to Normal, but Ill lower my opacity down to 90% just to reduce the glow effect a little bit:
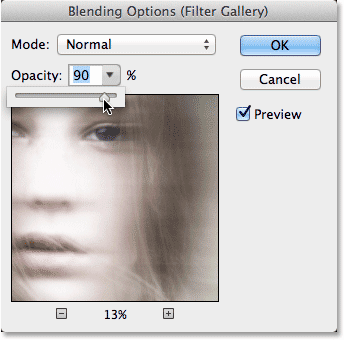
Click OK when you’re done to close out of the dialog box. Here’s my image after lowering the opacity:

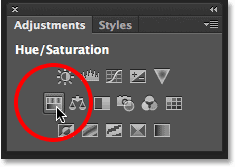
Step 11: Add A Hue/Saturation Adjustment Layer
Lets finish off the ghosting effect by colorizing it with a Hue/Saturation adjustment layer. Click on the Hue/Saturation icon in the Adjustments panel (first icon on the left, middle row):
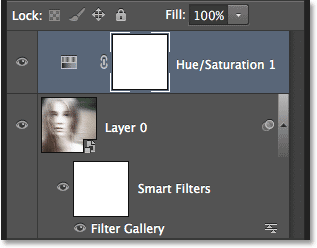
Photoshop adds a new Hue/Saturation adjustment layer directly above the Smart Object in the Layers panel:
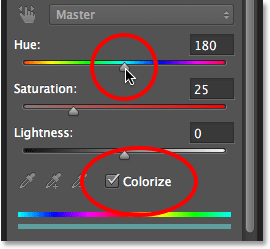
The controls and options for the Hue/Saturation adjustment layer appear in Photoshops Properties panel. First, select the Colorize option near the bottom of the panel by clicking inside its checkbox. This will allow us to colorize the entire image with a single color. Then, drag the Hue slider left or right to select a color. Youll see the color changing in the document as you drag the slider. I think a greenish blue works well for the ghosting effect so Ill set my Hue value to around 180:
Heres my image after colorizing it:

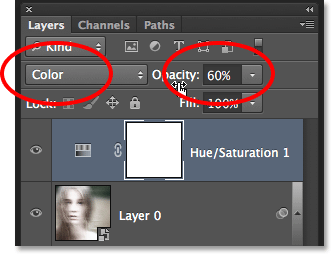
Step 12: Change The Blend Mode To Color And Lower The Opacity
Finally, change the blend mode of the Hue/Saturation layer from Normal to Color. The difference may be slight, but this will allow the adjustment layer to affect only the colors in the image without affecting the brightness values. Youll find the blend mode option in the top left of the Layers panel. Directly across from the blend mode option is the Opacity option. Lowering it from its default value of 100% will allow some of the original colors from the image to show through. You may or may not like the result with your image so this final step is optional, but in my case, Ill lower the opacity to around 60%:
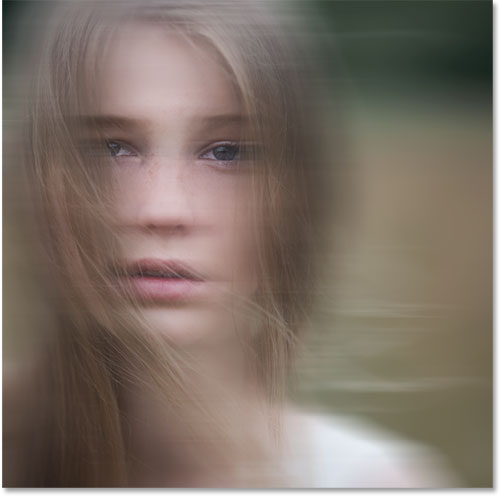
And with that, were done! Here, for comparison, is the original image once again:
And here, after changing the blend mode and lowering the opacity of the Hue/Saturation adjustment layer, is my final "ghost" effect:
 Tags :- Photoshop 8 , Photoshop 7 trick , trick for Photoshop CS6 , photoshop PNG , Png Images , image png , png , transparent images , transparent png , psd , psd image , png free , download png , png for free , png blogspot , png photoshop , photoshop png images , images for photoshop , cs5 trick , photoshop tricks , photoshop tricks , photoshop background , photoshop psd , photoshop cs5, photoshop cs5 trick,
 Wednesday, March 1, 2017
GET WordPress 3D Banner Rotator With Statistics CodeCanyon
GET WordPress 3D Banner Rotator With Statistics CodeCanyon
Salespage:Download:Code:http://codecanyon.net/item/wordpress-3d-banner-rotator-with-statistics/410975VirusTotal:Code:http://www.multiupload.com/FST60Y51GHCode:http://www.virustotal.com/file-scan/report.html?id=4e4aeae436d9f5836a0220113d933674b09bcdce923d3f314e830b3658e95d47-1322262413

WORDPRESS 3D BANNER ROTATOR PREVIEW
Welcome to our brand new Wordpress banner plugin. Beautiful 3D banner rotator plugin with Statistics will showcase your commercial banners in an impressive and creative manner. It has been made out of our successfull Flash version. A lot of cool features will help you adjust the banner to your web page. If you think usual banners are a bit boring and would like a dynamic way of displaying them then this is the plugin for you.We have also prepared an extensive statistics panel with graphs. You can see how much impressions and clicks each image within each banner has and what CTR rate is. There are three different graph views. See how they look in attached screenshoots.
3D rotations are specialty of our Wordpress banner. You can set how much banner rotates along x, y and z axis. Please note that you set exact value for each of them (1 – full circle) so that gives you endless possibilites. You can set a simple flip, newspaper, 2 dimensional and 3 dimensional rotations. Please preview some more of them in our Flash version of a 3D banner rotator.
Images in previews are not available for download and are only used in previews.
Available link for download
Saturday, February 25, 2017
Free Download Windows Repair Pro 3 9 5 Full Version With Crack for Windows
Free Download Windows Repair Pro 3 9 5 Full Version With Crack for Windows

This is especially important if you have made many changes to the settings of your windows and it turns out there is a crash on the settings you created it. Then the best way to cope is to restore settings such as the original windows.
- Rearrange and edit the registry
- Reset file access
- Register the File System
- WMI repair
- Windows Firewall Service
- Repair Internet Explorer
- Repair MDAC and MS Jet
- Hosts File Recovery
- Remove Policies Set
- Repair icons
- Repair Winsock and DNS Cache
- Delete Temp Files
- Repair proxy settings
- Repair Windows updates
How to Install
- Download and extract the file "Windows Repair Pro 3.9.5 Full Crack" is.
- Extract also crack file inside the folder.
- Install the program as usual.
- Go to crack folder, and then copy and paste all the files in it to the programs installation folder "Windows Repair Pro" on your pc or laptop.
- Select the copy and replace.
- done
Download

- Crack only [Link]
Available link for download
Monday, February 20, 2017
Get Instant Results for your Queries with WhatsApp BOT
Get Instant Results for your Queries with WhatsApp BOT
WhatsApp BOT sounds like a hacking machine these days, as lot of people are facing online attacks using any of these unknown applications and scripts, well this is something you cannot ignore. I personally tested this up and its way cooler then it sounds. Yes now you can get instant results for queries you type in, like getting weather forecast, searching for some popular figure on Wikipedia and even translating any language.
Available link for download
GIMP software with Photoshop feel
GIMP software with Photoshop feel

If you dont have photoshop you can download Gimp software for free. The file format support ranges from the common likes of JPEG (JFIF), GIF, PNG, TIFF to special use formats such as the multi-resolution and multi-color-depth Windows icon files. The architecture allows to extend GIMPs format capabilities with a plug-in.
To save disk space, any format can be saved with an archive extension such as ZIP, GZ or BZ2 and GIMP will transparently compress the file without you needing to do any extra steps.
If you used to photoshop then download GIMPshop . Gimpshop is a modification of the free/open source GNU Image Manipulation Program (GIMP), intended to replicate the feel of Adobe Photoshop. Its primary purpose is to make users of Photoshop feel comfortable using GIMP.
It shares all GIMPs advantages, including the long feature list and customisability, while addressing some common criticisms regarding the programs interface: GIMPshop modifies the menu structure to closely match Photoshops, adjusts the programs terminology to match Adobes, and, in the Windows version, uses a plugin called Deweirdifier to combine the applications numerous windows in a similar manner to the MDI system used by most Windows graphics packages. While GIMPshop does not support Photoshop plugins, all GIMPs own plugins, filters, brushes, etc. remain available.
Due to the changes to the interface, many Photoshop tutorials can be followed in GIMPshop unchanged, and most others can be adapted for GIMPshop users with minimal effort.
Latest GIMP Sofware. download
Available link for download
Tuesday, January 31, 2017
Free Scramble With Friends apk
Free Scramble With Friends apk
Scramble With Friends apk Free Brain & Puzzle 5.61 Free Scramble With Friends v4.81 Final .apk StarCaptain v1.2 Final.apk The Bards Tale v1.2 Final .apk The Haunt 2 v1.00 .apk ZomNomNom v1.1.0 Final .apk.,Scramble With Friends Android Apk Download - If you have been familiar with the scramble game, you might wont find any difficult when playing Scramble ,Poweramp Music Player v2.0.9-build-529 APK. Powerful Music Player for Android Poweramp is a powerful music player for Android. Key Featur Email This BlogThis!,Free APK from Play Store. Theres a new nearby button. Tap it to see which of your friends are around. - Want to meet up with someone right now?,Download Scramble with Friends apk Download Shane Reaction Zombieland apk Download Striker Soccer Euro 2012 apk Download Townsmen apk Download Talking Tom ,Description Scramble With Friends - The fast, fun word-finding game everyones playing! The wait is over! Play the deluxe version of Scramble With Friends ,Gems with Friends Combine colorful gems in head-to-head competition with your friends. Scramble With Friends Find words in a jumbled grid of letters.,Scramble With Friends Android Apk Download - If you have been familiar with the scramble game, you might wont find any difficult when playing Scramble ,Scramble With Friends v4.87 Apk Game. By admin on Saturday, February 2, 2013. ame from the makers of Words With Friends! Challenge your friends in 3, two ,Scramble With Friends Free is certainly one of should have apps for your android device. Just to inform you a number of days ago this app up to date to new

Scramble With Friends Free 4.60 for Android | Free Download ...
Scramble With Friends Free is certainly one of should have apps for your android device. Just to inform you a number of days ago this app up to date to new
how to add friends on pou categories - Android On Your windows
Scramble With Friends v4.87 Apk Game. By admin on Saturday, February 2, 2013. ame from the makers of Words With Friends! Challenge your friends in 3, two
PES 2012 Android Apk Download | Phones Tab - New Phones and Tablets
Scramble With Friends Android Apk Download - If you have been familiar with the scramble game, you might wont find any difficult when playing Scramble
Mobile Games | Zynga
Gems with Friends Combine colorful gems in head-to-head competition with your friends. Scramble With Friends Find words in a jumbled grid of letters.
Scramble With Friends PC Version (Free Download) ~ I Love PC Version
Description Scramble With Friends - The fast, fun word-finding game everyones playing! The wait is over! Play the deluxe version of Scramble With Friends
Best android games 2012 free download - YouTube
Download Scramble with Friends apk Download Shane Reaction Zombieland apk Download Striker Soccer Euro 2012 apk Download Townsmen apk Download Talking Tom
APKDAD
Free APK from Play Store. Theres a new nearby button. Tap it to see which of your friends are around. - Want to meet up with someone right now?
Full Android APKs for Free
Poweramp Music Player v2.0.9-build-529 APK. Powerful Music Player for Android Poweramp is a powerful music player for Android. Key Featur Email This BlogThis!
Google Play Store Apk Download | Phones Tab - New Phones and Tablets
Scramble With Friends Android Apk Download - If you have been familiar with the scramble game, you might wont find any difficult when playing Scramble
Best Top Paid Android Games October 2012 - Temple Space Mooniacs ...
Scramble With Friends v4.81 Final .apk StarCaptain v1.2 Final.apk The Bards Tale v1.2 Final .apk The Haunt 2 v1.00 .apk ZomNomNom v1.1.0 Final .apk.


Available link for download
Monday, January 23, 2017
Free Download WonderFox DVD Ripper Pro 8 0 Full Keygen for Windows with Installation Instruction
Free Download WonderFox DVD Ripper Pro 8 0 Full Keygen for Windows with Installation Instruction

The quality that you will get the same as the original DVD without any quality reduction at all. So you will get the experience of watching movies superb though youve seen from HP or other portable media. The time required to convert DVD to Mp4 format also does not require a long time, so it will not take up your time. What are you waiting, soon you download and install DVD Ripper Pro Full WonderFox this now.
- Extract and convert video to various formats and famous
- Keep the original video quality (0-Quality-Loss)
- Support break the locks and the majority of copyright restrictions
- Having editing features such as cutt, crop and special effects.
- Feature Extraction for iPad, iPhone, Apple TV, Android Tablet, Samsung Galaxy and ...
- DVD backup in minutes
- Convenient user interface without complexity
- Setting Including audio video encoding, bitrate, frame rate, aspect ratio, resolution, audio codec, audio channel number, sample rate
- Download and extract the file "WonderFox DVD Ripper Pro 8.0 Full Keygen" is.
- Extract also keygen file inside the folder.
- Install the program as usual.
- After the installation process is complete, please open the program "WonderFox DVD Ripper Pro" is.
- Still in a state of open programs, you open the folder and run the file keygen keygen by right click, and select Run as administrator.
- Click Generate.
- Back to the program "WonderFox DVD Ripper Pro" you click on the register and use the existing serial keygen for the registration process.
- done
Keygen Only [Link]
Available link for download
Saturday, January 21, 2017
Free Download SQl Server 2014 Express with Tools Service Pack for Windows
Free Download SQl Server 2014 Express with Tools Service Pack for Windows

- Operating System: Windows XP/Vista/7/8/8.1/10
- Memory (RAM): 512 MB of RAM required.
- Hard Disk Space: 1 GB of free space required.
- Processor: 1 GHz Intel Pentium processor or later.

Available link for download